How to Shoot Stop Motion from Above
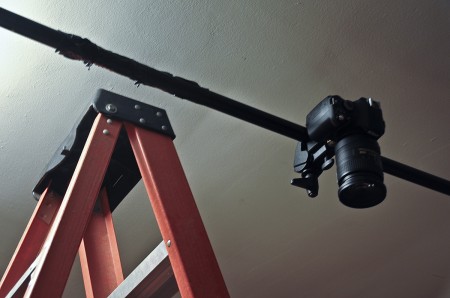
You do not want to know how long I spent trying to rig a vertical stop motion set up this week. Duct tape was flying around everywhere, lights were falling and shattering from above, and I had to take at least one ‘cool down before I break something’ walk. Surprisingly, Google was unhelpful in providing useful solutions — though this may have had something to do with a confusion in terms (is it aerial stop motion? vertical? 90 degrees?) I never quite know what to classify it as.
Anyway, I’ve written this brief process post about how I set up everything. It worked great for me, but I do not intend this to be a “this is HOW you do it” type article. Classify this as a go-to “bootleg” option if you don’t have access to one of those crazy $10,000 rigs that lets you fly above your subject etc. If you are looking for a relatively easy and inexpensive way to complete this type of project, this is one way to do it. I’ll walk through the supplies and exactly what I did that worked best for me. At the end of the day, it’s actually pretty darn easy — but it’s always nice to get a peak at a successful process just in case you’re spinning your wheels. There probably is a better way to do this, but I couldn’t find one. (And do excuse the slightly blurry photograph above…unfortunately the camera that has the external flash capability was the one being photographed…)
And in case you have no idea what I’m talking about, this video is a GREAT example of this type of stop motion done extremely well.
Supplies
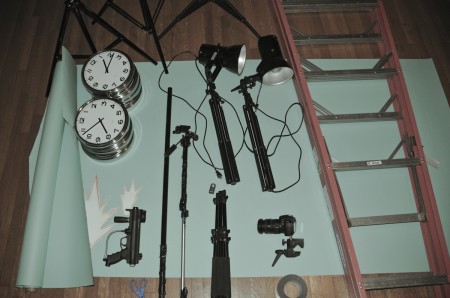
-The first thing you need is obviously a still camera. Crucial to keep in mind is to set your focus to manual (and pretty much everything, exposure etc). I forgot to do this the first time around and you end up with really inconsistent footage once you stitch everything together. Get it set up in the beginning and lock it in.
– Remote trigger. Unless you have exceptionally high ceilings and can float above your camera, you are going to want to cue the shutter remotely.
– Ladder. Also worth having is a really high ceiling. If you want to capture an entire person in one frame, you have to have the camera way high off the floor. Thus, to access the camera (and set it up etc) you will need an equally high ladder. (If you are working with a person that is 6’5″, i.e me, you probably won’t have high enough ceilings to get them in the shot completely.)
– Studio clamp. This is the lifesaver. Without this you might as well give up now (or duct tape yourself to the ceiling and try and stay still).
– Background stands and cross bar (or some way of placing something for the clamp to attach to directly above your subject).
– Lights. Since you will be taking hundreds or thousands of photographs, it’s imperative that you have consistent lighting throughout the shoot. You’ll probably want to shoot at night to eliminate changes in natural light. It’s easy to underestimate how much tiny little light changes can affect the final product.
– Background paper. This just helps make the floor look like it’s actually a wall. It depends what you’re shooting of course.
– The MP5 looking object (and the countless clocks) in the picture above were props in my project — not necessities for your typical shoot.
Process
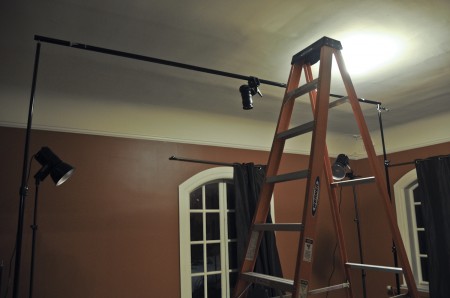
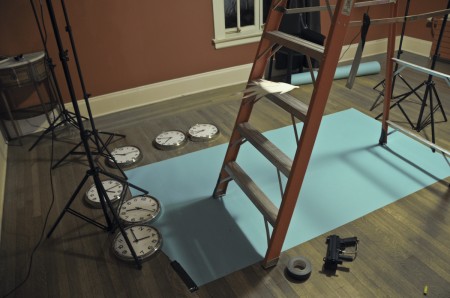
1. As you can see in the pictures above, the camera is suspended directly above my live project area (the blue paper). To do this it’s very simple: you set up your background stands as far apart as your crossbar will allow, attach the crossbar, then move the ladder into place. The reason you want as much distance between the stands as possible is so you have that much space to work with. If they are too close, your camera will pick up their legs and it will throw off the whole illusion.
2. Attach the camera to the clamp (screws into the bottom of most DSLRs) and the clamp to the crossbar. It’s very easy to manipulate the orientation of the camera once it’s on the clamp. Most likely you’ll want it pointed straight down, but you can also give it a tilt or whatever (though my clamp could not rotate at all).
3. Lay down your background paper and duct tape it to the floor. You want as little movement as possible over the course of the shoot.
4. Place an object exactly where most of your action is going to take place and get your settings dialed in. Focus, exposure, etc all should be set and locked in. Also make sure you aren’t capturing any of the stand’s legs or bits of the uncovered floor. Tiny little mistakes like this are easy to overlook and can ruin the shoot. If you are lighting the scene yourself, make sure to have these on when you are getting your settings.
5. If you are the subject and the photographer, you will want to find yourself a willing assistant to help you trigger the camera. I tried to do everything by myself at first and this was impossible. Just make sure you find someone with patience.
6. Ideally, figure out your frames / second before you start shooting. I had my project set up to display each photo for 1/8 of a second (so 8 pictures per second). This was basically an arbitrary decision, but seemed to work pretty well in the end.
7. Once you know how many pictures you will need per second, you can plan out your actions based on this. So for example, I knew that I wanted to enter the frame exactly 5 seconds into the song I planned to use. This meant I needed 40 blank pictures before I even came into the scene. I also knew I wanted to be on camera, chilling out, for 10 seconds. Thus I needed to take 80 pictures of just me. If you imagine what a normal person might do in 10 seconds just standing there (tap their feet, look both ways, place hands in pockets etc) you can try and match each action to how long you think it would take in real life. I messed up here and would put my hands in my pockets over the course of 2 pictures (so 2/8 of a second). When you get this stitched together it looks really unnatural. The more planning you can do at the beginning, the easier the editing will be.
8. Depending on your project, the kind of pictures you need to take will differ substantially. I will say that using humans in this type of video makes everything way more complicated.
9. Once your pictures are all accounted for (you’ll have hundreds if not thousands) it’s time to bring them into an editing program. I use Final Cut and make sure to set it up so any pictures brought into the timeline will adhere to a preset duration. I use 00:00:00:04 per photo. You set this under “User Preferences —> Editing —> Still/Freeze Duration”. What you choose to do here depends on how smooth/choppy you want your video to be. This also will depend on how many photos you took. The more you have, the shorter duration you can make each frame (and the smoother it will look).
10. If you are a super human, you won’t need to edit anything and your movie will just unfold before you at this point (if you shot all your photos in sequence). More than likely though, you will need to go in and edit out (or add in) a frame here and there.
11. Send it to Color. My computer choked when I sent Color a file containing 1400 images — one way around this is to export the sequence as a Quicktime file (essentially flattening it) and reimport it into Final Cut. Then you can send it to Color and it will just interpret it as if it was a single video file, not thousands of pictures.
12. Depending what kind of project you are making, this is basically the end.
To give you an idea of how lost I was initially, my first solution was duct taping the camera to the ceiling. While this works, it’s impossible to review you shots (crucial when doing this type of work). Not to mention the fact that your camera may (and probably will) come careening down onto your subject after about 30 minutes. So Step 1 is don’t duct tape your camera to the ceiling.
The Project
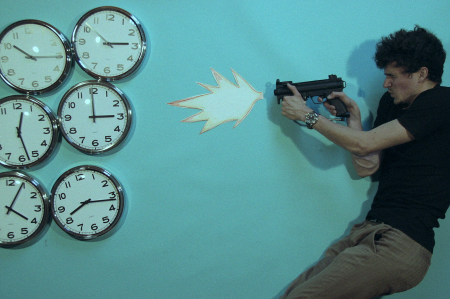
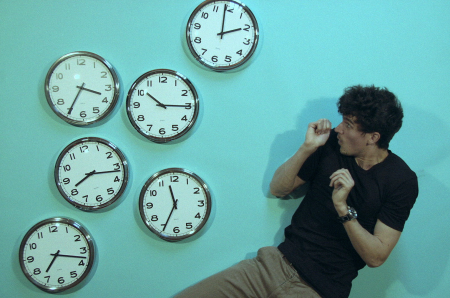
Now this is usually the point where I would include the actual project I was working on. The above shots are some still from it, but the video won’t be making an appearance today. Basically I want to reshoot it. It’s definitely a work in progress. There were some massive errors made that have super easy fixes. The main one was I rolled around to move from place to place, rather than pretending to walk. This ruined the illusion of me standing on a wall and instead made it look like I was lying on the ground (since I was..). Anyway, I’m not proud of it just yet. The process worked, but the video doesn’t quite yet.
Any questions or suggestions/further solutions, let us know in the comments!

23 Comments Leave A Comment
Shelby says:
April 2, 2010 at 12:07 amThe shadows might be another one of those slight inconsistencies. Did you try softboxes or throwing the light off the ceiling?
alex says:
April 2, 2010 at 12:19 amI experimented a little, but not nearly enough with light. One thing I didn’t try was putting the lights along the floor, to simulate lights from “above” for the person in the scene.
eydryan says:
April 2, 2010 at 1:52 amNo offense but the lighting is… bad. At least in those two shots one is underexposed and the other has long distracting shadows… Move the lights closer or get more powerful lights. Also, try to softbox them or point them away from the scene to get more even lighting.
Again, if you’ll look at the video you posted you can see that the lighting is powerful and even. I usually use some (quite bothersome) 500W reflectors I picked up at the local electric store, and I like them because they’re cheap and I know their colour temperature (2000K).
Also, be careful about the lighting on the watches, it’s really distracting in the first shot to actually see the lights reflecting off them.
wes says:
April 2, 2010 at 5:48 amagreed. improving the lighting, will improve the project.
faberdesign says:
April 2, 2010 at 7:58 amI can attest to the annoyance of getting a rig setup for a ‘looking down’ stop motion piece. Although my project a while back was considerably simpler since I was only shooting a board game from above, which allowed me to use two chairs and a couple of pool cues and some clamps to do the rigging. It only had to sit about 4 feet above the ground. Hmm. I wonder what happened to that old thing…
Nic says:
April 2, 2010 at 11:48 amI just had a photoshoot yesterday where I was the subject and the photographer and one thing that made it a lot easier was to have my camera tethered to my laptop. Once set up, I just had it shoot at an interval. Easy beesy.
Rob says:
April 2, 2010 at 12:17 pmOne time saving tip for FCP would be to export a reference movie – this is basically a shortcut to every frame – saves doubling up on file sizes…
joe says:
April 2, 2010 at 12:25 pmNice overview of the process… i agree with the comments on the lighting and reflections though… also – the paintball gun looks a little awkward to me without the barrel.
look forward to seeing the end product.
Martin Reisch / *safe solvent™ says:
April 2, 2010 at 12:30 pmif i can sugggest one thing having done many stop-motion projects with my Canon 40D and come up with the best workflow for editing such project…?
1. Open as Image Sequence in Quicktime 7 Pro
(this will allow you to have the full resolution STILL in a quicktime container)
2. Export as Apple ProRes (LT, or HQ) and RESIZE to 1920×1080 and FPS of your choice… (generally, 24p or 30p)
3. Import this new quicktime into FC for editing.
editing will be 10000x smoother, no render times and alot less hassle than individual stills in a timeline.
Thought it would be nice to give some advice for once, to a person whom i deeply respect and adore their creative works!
cheers.
Martin
sean patrick says:
April 2, 2010 at 3:16 pmlooks great alex. the idea is pretty neat too. thanks for sharing your anecdotes and comments…
tim says:
April 2, 2010 at 6:15 pmquestion for Nic – what software do you use when shooting tethered?
I have made a few small scale stop motion projects using an intervalmeter with 40D & treated it more like a performance eg
http://vimeo.com/9850301
But for the next project, after getting advice from a far more experienced stop motion animator I bought a copy of Dragon Stop Motion software which allows full camera control, live view, onion skinning etc… and also came with a USB remote for shooting – so far so good…
http://www.dragonstopmotion.com/
(I’m not affiliated or anything)
Dave says:
April 3, 2010 at 8:26 amI’m sure you must have seen Coldplay’s video, directed by Shynola, for Strawberry Swing (http://www.youtube.com/watch?v=BYtk1Z0UUuE). Talk about backing the camera up to fit a body…
Also, an interview about their specific process: http://www.coldplay.com/newsdetail.php?id=448
Good work, by the way.
Jonathan says:
April 4, 2010 at 7:00 amthis is also a fantastic example of this type of stop motion: http://vimeo.com/5597012
Tom says:
April 4, 2010 at 11:19 amGreat post! We encountered some very similar challenges when trying to shoot all the stop motion for our new agency site. A custom glass table, complete with green screen had to be constructed. Not to mention every letter had to be hand cut out of foam core, the results can be seen here:
http://www.bluecollaragency.com
Good times! Keep up the great posts!
jobac says:
April 4, 2010 at 5:59 pmCheck out the master, William Kentridge (perhaps the inspiration for coldplay’s video above). Add to it his astounding ability to tell a story with a gentle sense of humour.
http://www.moma.org/visit/calendar/exhibitions/964
Meera says:
April 6, 2010 at 5:52 pmReally great! I’m hoping to do this for a photography assignment and have been racking my brain how to do it, inspired by Jan von Holleben’s work.
Thanks for posting this!
M
mark says:
April 6, 2010 at 8:17 pmPVC industry is currently the world’s rapid development and broad prospects, all countries are optimistic about the potential of PVC, as well as its ecological benefits, PVC is its superior and unique performance to the world to prove their role and status of the current can not be replaced by any other product , social development needs of its environmental protection need it, and it is our human society, civilization and progress of the inevitable trend. http://www.ceilingpanel.net
JP says:
April 7, 2010 at 8:27 pmLove the video.. here is a funny parody…
http://www.youtube.com/watch?v=rvp7PgWGQzA
Topher Sipes says:
April 12, 2010 at 10:37 pmI’ve a buddy from back in art school, Johnny Villareal who’s thesis involved creating an interactive stop motion animation station that allow 3 different people to simultaneously create animations by manipulating objects or drawing directly onto the chalk friendly surface. There’s a computer interface in front of them that allows them to take a snapshot and even view their animation progress so far.
He’s been able to take this “Edge of the Imagination Station” to all sorts of places including galleries, music festivals and children’s museums. Check out some of the results at:
http://www.youtube.com/profile?user=innovativehuman#g/u
fax software says:
September 16, 2010 at 8:59 pmThese are all fairy tales!
Dorsey Garrington says:
December 30, 2010 at 5:19 pmGreat post. There’s a lot of useful information. I wanted to let you know something though – I am running Debian with the current of Firefox and the design of your blog is kind of weird in some places for me. I can read the articles, but the navigation doesn’t function so good.
Laone says:
January 17, 2011 at 10:32 pmI’ve been struggling to do a “frankfilm”-esque graphic (using printed matter) collage style and your setup looks like it may work. What was your final format? i have a fcp editor but i want this to be put together by me and be able to be given to my editor in a way that he can use it. I’m a director of photography but this is my first foray into the graphic media collage stop motion animation and i found your walkthrough helpful and would appreciate any input you could give. i also found several other comments posted suggesting programs that will help useful, so thank you for your sharing with us. Anyone who’d like to give advice on the best way they think to do a piece such as i listed above, please don’t hesitate to contact me. oceanchick99 on twitter or Laone.Collins at yahoo. i could seriously use some advice. i’ve done basic stop motion segments before using models, dolls, cheetoes, and other things just to get the right feel to it once it hits editing, so any advice is totally gratefully appreciated and will be given credit in the documentary featuring it UnanimousMovie.com. Again, thank you. Not everyone shares their discoveries and bless you, man for sharing yours. Bless the commenters for sharing theirs as well.